Back in the 1980s, when I was in high school and dinosaurs still roamed the earth, a group called Scandal sang a catchy song called “The Warrior” to much acclaim. It was good enough to reach the Top 10 on the U.S. charts, peaking at No. 7. It resonated with crowds because of its catchy music and positive message of fighting for something worth fighting for. I liked it then, and I love the idea of fighting for something worth fighting for.
Such as your health.
It’s no surprise to anyone that our modern-day world struggles with fitness and health. There’s so much we need to do to preserve our health and so little time to do it, and the days, weeks, and years seem just to fly by. With that passing time, we can grow weaker and increasingly unfit unless we’re working consistently to maintain ourselves.
4 Warrior Pose Variations–Plus a Bonus Pose
The following classic yoga poses can be used to develop strength, endurance, and flexibility all at the same time. Practice these poses often, and you’ll have a great shot at maintaining your health as you grow older, and even while you’re young. In fact, children usually love the sense of empowerment derived from doing them while, under the surface, they are bolstering strength, good posture, and a healthy self-image.
I’ve included the foundational mountain pose from which the warrior poses begin, and it offers a whole set of benefits all its own. I’ve also included their Sanskrit translations, as often used by yoga teachers, as they are so elegant.
These exercises work well for my patients, but I suggest that you consult your medical provider to make sure that they are right for you.
1. Mountain Pose (Tadasana)
First of all, let’s clear something up about this pose: It is far from just standing in place—don’t be fooled by what you can’t see. In fact, a whole lot of conscious effort is going into it when it’s done properly. Mountain pose establishes good posture and balance and enhances both proprioception and interoception by teaching your nervous system to actively coordinate alignment, weight distribution, and breath. It also induces mindfulness, which is so important for making it and other exercises as effective as possible.
Step 1: Move into a standing position and just stand there. OK, I’m just kidding. Instead, stand with your feet hip-width apart for stability. Align your torso and hips directly over your feet. Rotate your palms forward and gently pull your shoulders back without lifting your ribs.
Step 2: Ground down through the points of both feet: the base of the big toe, little toe, outer edge of the foot, and center of the heel.
Step 3: Keeping your shoulders over your feet, slightly tuck your tailbone and gently pull your belly button toward your spine as you firm your core and spinal muscles.
Step 4: Gently contract your calf and quad muscles, and the rest of your muscles, as though gently squeezing your bones.
Step 5: Keeping your chin level, imagine your head drifting upward, as though a string attached to the top of your head were pulling you up. Once you move into position, focus on continual engagement and breathe slowly in and out through your nose. Try to hold for at least 15 to 20 seconds.
Variation: Mountain pose can also be done against a wall, not only for stability if your balance is challenged, but also to gain a greater sense of what is going on in your body. Being up against the wall allows you to feel the proper positioning of your head and shoulders and provides resistance to gently press all the connected points into the wall—even your fingers and forearms—to deepen upper body engagement.
Doing mountain pose against the wall has a multitude of additional benefits that you’ll feel as soon as you step away and walk around—your posture will have a natural , upright alignment. I recommend that everyone try this variation to see how it works for you. It may just become your new favorite everyday pose, especially for breaking up long periods of sitting.
Why I Like It: Why yes, there actually is a lot going on with this exercise. The beauty is that it teaches you proprioception through controlling separate areas of your body and combining multiple areas of awareness into one intimately integrated whole.
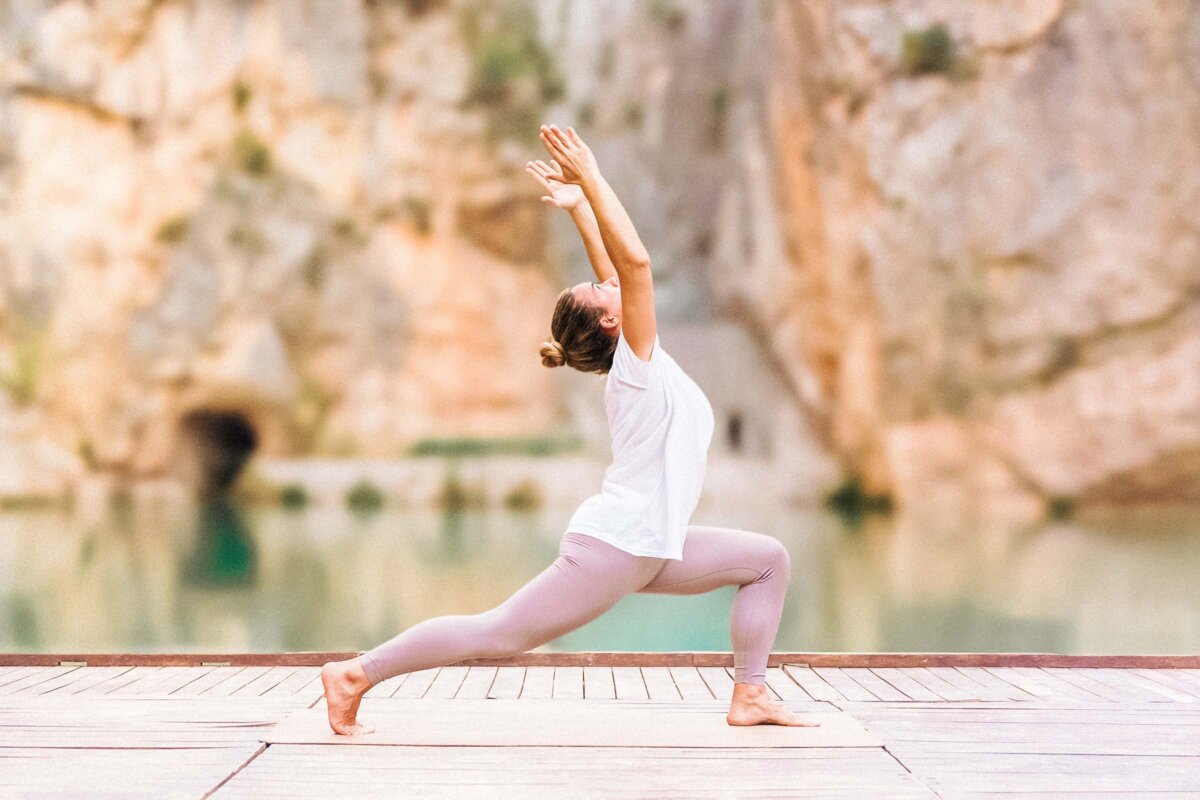
2. Crescent Warrior (Ashta Chandrasana)
Keen readers will note that this series includes warrior two and warrior three poses but makes no mention of warrior one. Such an exercise does exist, but I chose not to use it. I purposefully substituted the crescent warrior exercise for warrior one for several reasons: It offers superior core engagement, places greater focus on balance, and stretches the hip flexors more effectively.
Very importantly, it also allows you to better “square” your pelvis, thus reducing strain on your knees and sacroiliac joints. After all, we want to come out of this like warriors, not pain clinic candidates. Crescent warrior transitions well from mountain pose.
Step 1: From mountain pose, step your right leg back into a lunge position.
Step 2: Position your left knee directly above your left foot. At the same time, keep your right knee straight and press back with your right heel to maximize the stretch in your hip flexors and quads.
Step 3: Keeping your trunk upright and your legs in place, raise your arms straight up over your head. Hold this position for approximately 15 seconds, then return to upright standing and repeat on the other side. Try to perform three sets on both sides.
Modifications: Only lower into as much knee flexion on the front leg as you comfortably can. Over time, you should be able to move lower into the stretch. If balance is a challenge, you can bring your back knee to the ground, as in a low lunge. You can also stand close to something you can use to briefly stabilize yourself should you start losing your balance.
Why I Like It: There’s a bundle of goodness going on in the core, lower body, and hips. The position of the arms also expands the chest, promoting deep, healthy breathing.
3. Warrior 2 (Virabhadrasana II)
Although crescent pose had you facing forward, warrior two will have you largely facing to the side. This delightful pose opens the shoulders, chest, and hips while also strengthening your legs. It also transitions very well from crescent pose or warrior one.
Step 1: From mountain pose, take a large step back with your right leg. Rotate your right heel down while keeping your left foot aimed straight ahead. Your hips and trunk should now be facing sideways.
Step 2: Move your left leg to approximately 90 degrees of hip and knee flexion. Keep your left knee directly over your left foot and be sure not to let your left leg roll in or out. Keep your hips in a neutral position, in line with your trunk. Imagine your body between two panes of glass.
Step 3: Next, bring your arms into a T position, with your left arm directly in line with your left leg and your right arm reaching back directly over your right leg. Slowly turn your head toward your left hand, aligning your nose with your left middle finger. You will look like someone getting ready to fire a javelin. Hold this position for approximately 15 seconds, then return to standing and repeat on the other side.
Step 4: Try to perform three sets for each leg. If you would like to do them all on one side at a time, simply keep the arms up and straighten your front knee, then bend it back to 90 degrees and continue back and forth.
Modifications: If you can’t move the leading leg into 90 degrees of hip and knee flexion, just move as far as you comfortably can. If the knee is not directly over the heel, make sure that it remains behind the heel rather than in front of it; you can achieve that position by walking the back leg farther back. It’s normal to demonstrate a lot of postural movement in this activity, but if you struggle with balance, you can do the pose against a wall.
Why I Like It: In addition to targeting the quads, hamstrings, and glutes, warrior two also engages the chest and shoulders, opening the chest and front of the body to counter inward and forward slouching, one of the biggest current postural challenges in our modern world.
4. Reverse Warrior (Viparita Virabhadrasana)
The reverse warrior transitions beautifully from warrior two. In fact, it doesn’t take much more than lowering one arm, raising the other, and following the upper arm with your head. This pose will challenge you in many ways, but you’ll do great with practice.
Step 1: From mountain pose, take a large step back with your right leg. Rotate your right heel down while keeping your left foot aimed straight ahead. Your hips and trunk should now be facing sideways.
Step 2: Bend your left knee and hip to approximately 90 degrees of flexion. Keep your left knee directly over your left foot, and be sure not to let your left leg either roll in or out. Keep your hips in a neutral position, in line with your trunk.
Step 3: Bring your arms into a T position, with your left arm directly in line with your left leg and your right arm directly over your right leg. Slowly turn your head in the direction of your left hand, aligning your nose with your left middle finger, and turn your palm upward.
Step 4: Lean back with your trunk while lowering your right arm until it touches your right thigh. At the same time, elevate your left arm overhead while following the movement with your nose. Continue moving the stretch as far as you comfortably can. Hold this position for approximately 15 seconds, then return to the standing position and repeat on the other side.
Step 5: Try to perform three poses per side. If you would like to do them all on one side at a time, simply maintain the lunge and alternate between warrior two arms and the reverse warrior position.
Modifications: As with the other poses, if you can’t move the leading leg into 90 degrees of hip and knee flexion, just move as far as you comfortably can. You can also perform this pose next to a wall if you find yourself struggling with balance.
Why I Like It: Reverse warrior provides a great stretch for the trunk, and the lunge strengthens your leg muscles. Also, because you’re looking upward, it provides a great balance challenge. This may be called reverse warrior, but it will push you straight forward into much better physical health.
5. Warrior 3 (Virabhadrasana III)
The warrior three pose is a tremendous balance exercise that also engages the entire posterior chain of muscles, including the muscles around your ankles, hamstrings, glutes, and spine. It is also known as “balancing stick pose,” meaning that the goal is to maintain a straight line down the back of the body. It is one of the most challenging of the warrior poses, but you’ll do well with practice.
Step 1: Start in mountain pose. Step forward approximately 2 feet with your right foot and place your hands on your hips.
Step 2: Slowly hinge at your hips while keeping the straight line from your fingertips to your toes—as if your body were one long “balancing stick.” Your leg will rise in alignment with the rest of the body. If your back begins to round out of the stick position, rise back up to the point at which it’s straight and your hips are level, as getting parallel to the ground is less important than alignment.
Step 3: Next, as you grow more comfortable with your balance, bring your arms straight out to the sides, like a soaring bird—with your palms facing forward and thumbs up to keep your chest open. Keep your breath slow and steady through the nose. If you feel strong and confident, you can bring your arms forward until they are parallel with your ears; however, please note the caution below.
Caution: The arms forward position is not recommended for those with high blood pressure or existing heart conditions. I advise using the arms forward position only if you’ve been practicing for some time, and even then, it is best not to hold for more than 10 seconds per set.
Step 4: Hold your most aligned position for 10 seconds—yes, it’s hard—before returning upright and then repeating the movement on the other side. Try to perform three sets per side, with a mountain pose between each to allow the heart rate to fully settle before starting the next.
Modifications: If balance is a challenge, extend one leg straight back until the toes touch the floor and extend your arms forward. You’ll be a balancing stick with one toe on the ground and still reap the many benefits of the pose. In the video, you will see this variation first, as it is also used to establish alignment.
Why I Like It: Done properly, Warrior 3 offers the wonderful benefit of strengthening the cardiovascular system. It also refines postural strength and balance. Master this one, and you’ll gain fluidity of movement in ways you may not have felt were possible.
A Warrior Flow Option
If you like, you can string these poses together for a nice, neat little package of a workout. We’ve added in a few of the variations, and feel free to do as many of the built-in repetitions as you like—progressing as you grow stronger and more confident.
As a whole, the warrior poses are immensely beneficial and can serve as an effective full-body workout. These exercises can make you feel just plain strong, balanced, aligned, and capable. You may feel shaky initially, but I urge you to stay with them, because over time you will master them and reap all the benefits you fought like a warrior to gain. I recommend performing them at least three times per week and up to five times for the greatest benefits. I hope that they work well for you.
About the Fitness Model: Aerowenn Hunter is a health editor for The Epoch Times. She’s an accredited yoga therapist with more than three decades of teaching experience.
Views expressed in this article are the opinions of the author and do not necessarily reflect the views of The Epoch Times. Epoch Health welcomes professional discussion and friendly debate. To submit an opinion piece, please follow these guidelines and submit through our form here.