My daughter purchased a fixer-upper in a great location, and we were excited about her homeownership experience. There was a challenge, however: Her apartment lease was due to expire in 30 days, and there was a lot to do, including painting. The fact that she was converting dark brown paneling to white walls only compounded the challenge.
Having swung many paintbrushes while working my way through college, I was up for the challenge, but with so much work to do, I knew I had to make the most of my time. I started on Friday morning and didn’t finish until Saturday afternoon. By the time I finished painting those walls, I had a considerable amount of muscle soreness from the bending, reaching, and positioning I had done. I realized that many of the movements I performed were similar to the exercises I give my patients in the gym—and what a workout they were.
5 Wall Exercises for a Full Workout
The following exercises work together to provide a surprisingly effective workout routine. They are both stable and stout and can be performed almost anywhere.
These exercises work well for my patients, and I make good use of them personally, but I suggest that you consult with your medical provider to ensure that they are right for you. The best thing about them? You don’t even need a paintbrush.
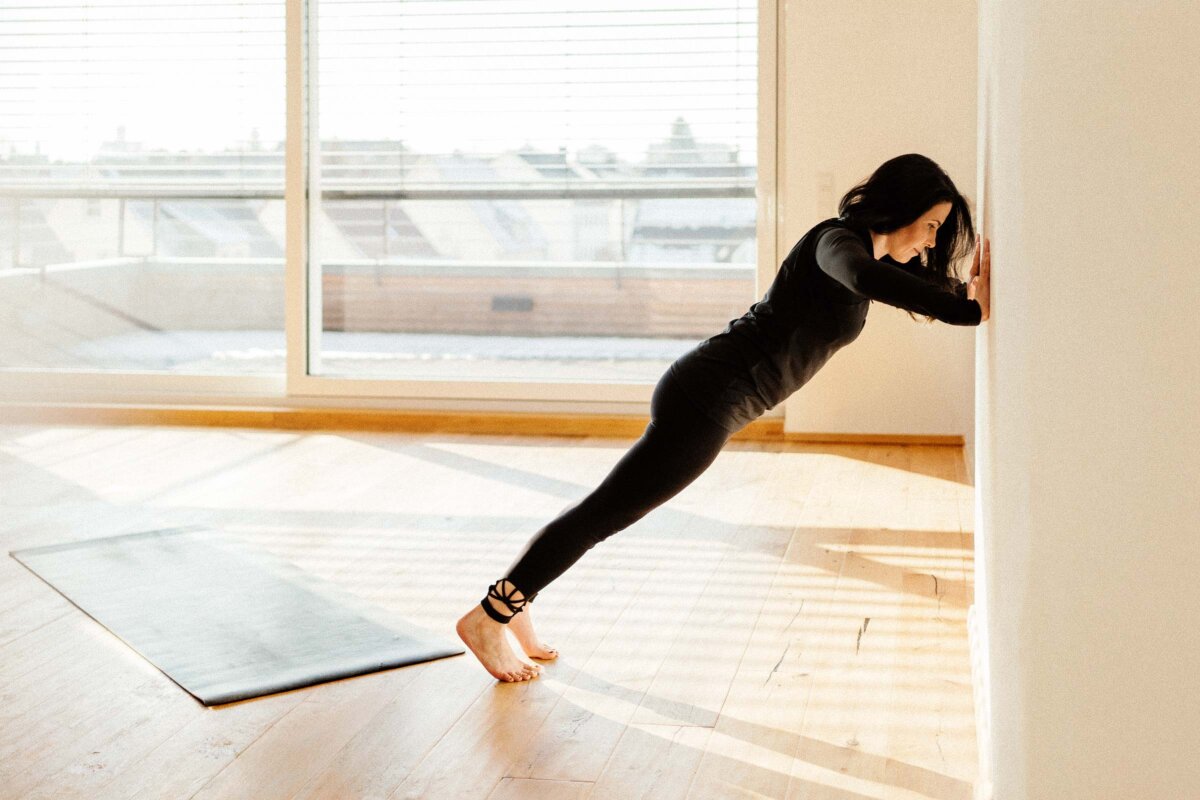
1. Wall Push-Ups
The classic push-up is a great exercise, but it requires a change from standing to a planking position on the floor, and it’s also a little tough on muscles and joints that aren’t used to exercising.
Step 1: Stand with your arms straight out, elbows locked, and hands on the wall. Slowly move your feet away from the wall until you’re placing discernible pressure on your hands. I find that approximately 45 degrees of “lean” accomplishes this nicely.
Step 2: Slowly bend your elbows and lean into the wall until your face is almost touching it. Push back to the starting position from there.
Step 3: Moving toward the wall and then pushing back up counts as one repetition. Try to perform three sets of 15 repetitions.
Modifications: If you can’t lower all the way to the wall, just lower down as far as you can before pushing back up. Feel free to modify the sets and repetitions to best suit your needs.
Why I Like Them: Wall push-ups provide many of the same benefits as regular push-ups while you’re standing, and they are easier to perform.
2. Lateral Wall Push-Ups
Next, let’s turn sideways and perform the activity with one arm at a time. Like reaching into that far deep crevice while painting.
Step 1: Stand sideways to the wall and place your right arm straight out to the side, palm flat against the wall. Stand far enough away to be able to fully extend your elbow.
Step 2: Slowly bend your elbow and allow your shoulder to move closer to the wall. Move as far as you can before pushing your elbow all the way out straight again and returning to the starting position.
Step 3: Moving toward the wall and then back to the starting position counts as one repetition. Try to perform three sets of 15 repetitions with each arm. You can perform all repetitions on one side and then the other, or alternate sides as you go.
Modifications: Can’t bend your elbow all the way or struggle to push back up from a fully bent elbow? Only move toward the wall as far as you can before pushing back up into the starting position.
Why I Like Them: Still easy to perform, lateral wall push-ups focus on your triceps and deltoids, and they also contribute to shoulder lateral flexibility.
3. Wall Mountain Climbers
The mountain climber exercise is excellent on its own, but, like push-ups, it can be intense for some people. Mountain climbers performed off a wall, however, provide many of the benefits of the classic mountain climber more accessibly.
Step 1: Start as you do with the wall push-up.
Step 2: Lift your right foot off the floor and bring your right knee as high as you can before lowering your leg back down and placing your foot back on the floor. Immediately lift your left leg in the same way and raise it as high as you can before placing it back down. Your movement timing will be at walking speed as you move through the left/right transitions.
Step 3: Lifting your leg as high as you can, then placing it back down, counts as one repetition. Try to perform three sets of 40 repetitions, or 20 repetitions per leg.
Modifications: If you can’t lift your legs very high, just lift them as high as you can. You may be able to lift them higher as time goes on. Move more slowly if a normal walking speed is too challenging for you. Speed up to a slow run if you want to make the exercise more challenging.
Why I Like Them: This exercise strengthens your hip flexors and provides great cardiovascular strengthening, especially when performed fast.
4. Wall Lunges
Wall lunges provide excellent stability due to the wall hold, but they also give you the benefits of the standard lunge movement. They focus on your quadriceps and glutes, some of the big, prime movers of your lower body. Get these muscles strengthened up, and you can fight ninjas. Well, maybe not ninjas, but you’ll certainly be able to put that strength to good use as you move throughout your day.
Step 1: Stand with your palms flat on the wall at approximately chest height. Move your left foot forward until your toes touch the wall, and move your right foot back approximately 2 feet.
Step 2: Bend your knees and bring your right knee either very close to the ground or (carefully) all the way down until you touch the floor. From here, keeping your hands on the wall, push back to standing.
Step 3: Lowering down and then standing back up counts as one repetition. Try to perform three sets of 12 repetitions. Careful, it’s a rigorous exercise.
Modifications: It’s completely understandable if you can’t lower all the way down at first; just lower down as far as you comfortably can before moving back up.
Why I Like Them: Where the standard lunge movement can be a bit unstable balance-wise, wall-assisted lunges are as stable as they come. Great workout, great stability—it’s win-win.
5. Wall Sits
I love wall sits. They’re a perfect cherry on top after all the other wall exercises—and painting—just make sure the wall is dry! They are a superb time-based exercise in which the goal is to increase the amount of time you can hold a challenging position rather than how many times you can perform it.
Step 1: Stand with your back against a wall. Place your feet approximately 2 to 3 feet away from the wall and bend your knees and hips to approximately 90 degrees of flexion. You will look like you’re sitting on an invisible chair in this position.
Step 2: Holding the position for 30 seconds, or as long as you can, counts as one set. Try to perform three total sets.
Modifications: However far down you can get is beneficial, so don’t worry if you can’t reach 90-degree flexion. If you can’t hold the position for 30 seconds at first, don’t feel defeated. You are awesome and have the potential to progress as long as you keep trying. Time considerations shouldn’t discourage you; they should serve as a great way to measure your progress.
Why I Like Them: Wall sits are very attainable, but to be honest, they’re quite a challenge. I perform this exercise frequently, and it never fails to both impress and humble me.
Wall-based exercises are surprisingly effective. They’re stable and straightforward, and I think you’ll like them. Try performing them at least three times per week, and optimally five times per week for the best results. Although they’re challenging at first, you’ll get the hang of them in no time.
About the Fitness Model: Aerowenn Hunter is a health editor for The Epoch Times. She’s an accredited yoga therapist with three decades of teaching experience.
Views expressed in this article are the opinions of the author and do not necessarily reflect the views of The Epoch Times. Epoch Health welcomes professional discussion and friendly debate. To submit an opinion piece, please follow these guidelines and submit through our form here.