
When gout strikes, it can feel as if your joints are on fire. Even the weight of your clothing can be unbearable.
Osteoarthritis relates to wear and tear of joints and heavily affects the leg joints, and rheumatoid arthritis is characterized by your immune system attacking your body and going after hands and fingers, however, gout is a type of inflammatory arthritis that tends to target your big toes and leg joints.
Gout occurs when a high level of uric acid (urate), a normal metabolic waste product, builds up in the body and forms needle-shaped crystals in and around your joints, resulting in inflammation and intense pain.
Another way to conceptualize gout is that it’s comparable to having sand in your joints. This “sand” irritates the joints—specifically, your bursae and tendons. Bursae are fluid-filled sacks that help cushion joints from friction and reduce the effects of wear and tear. Gout specifically affects the sheaths on the outside of tendons, which can trigger considerable pain when the muscles contract.
Research suggests that regular low- to moderate-intensity exercise can reduce uric acid levels. Low-impact activities are easier on the joints and can help reduce inflammation and prevent gout flares.
4 Stages of Gout
The Arthritis Foundation describes four stages of gout:
- Stage 1. Asymptomatic gout: When the body produces too much uric acid and high levels are reached and not eliminated by the kidneys, hyperuricemia occurs, which usually doesn’t cause symptoms.
- Stage 2. Acute gout: Consistently high uric acid blood levels can form crystals around the joints, resulting in inflammation and intense pain that can suddenly appear as an “attack,” lasting anywhere from a few days to two weeks.
- Stage 3. Intercritical or interval gout: Many people experience a period, which could be months or years, without symptoms after a gout attack and before another episode. During this time, uric acid levels can build up, which is why it’s crucial to continue to be proactive with prevention.
- Stage 4. Chronic tophaceous gout: In this stage, uric acid levels are not well-controlled, and crystals can build up, causing gout to become chronic. The crystals can cause nodules that can lead to joint damage and deformity, potentially causing permanent damage to joints and kidneys. Most people with gout never progress to this stage because of the availability of effective medical treatments.
With early treatment and lifestyle changes, gout is one of the most controllable forms of arthritis. By being proactive, many people can avoid gout flare-ups, decrease symptom severity, and often become gout-free. Exercise can be an important part of an effective treatment plan.
5 Exercises to Reduce Gout Flare-Ups
The following exercises have consistently reduced gout flare-ups in many of my patients. After an acute gout flare-up, it’s always important to remember to ease back into exercise and listen to your body. If you were running before the flare-up, you might want to start with walking or other lower-intensity exercises that avoid placing too much stress on a painful joint. Be sure to drink plenty of water, which is essential for reducing gout flare-ups.
1. Walking
One of the most effective ways to decrease the severity and duration of a gout episode is to get your blood flowing. Although walking may be difficult for people with advanced, severe cases of gout, most will find it highly beneficial.
Step 1: Start walking at half your normal pace for five minutes to warm up your joints.
Step 2: Increase your pace to a normal rate of speed and continue walking for 25 minutes.
Step 3: After 25 minutes, slow your pace to half-speed and walk for five more minutes to cool down to return your metabolism closer to its resting baseline.
Walking is a weight-bearing activity, so pay particular attention to what your body is telling you. A little discomfort is expected, especially when getting started, but experiencing severe pain is an indication that your body is not yet ready for this activity.
2. Pilates 100
Created by Joseph Pilates, the Pilates 100 is a classical Pilates movement and is a common starting point for most Pilates routines. I have long loved the exercise for its ability to facilitate increased heart rate and blood flow with a limited amount of total joint movement.

Step 1: Start this exercise by lying on your back on a flat surface with your arms resting by your sides.
Step 2: With straight arms, bend your hips and knees and lift your legs off the floor. At the same time, lift your head and shoulders slightly off the floor, being careful to avoid straining your neck.
Step 3: Keeping your elbows straight, lift your arms 4 to 5 inches off the floor and move your arms and hands up and down, 5 to 6 inches in total. It should be a relatively quick movement, performed at the rate of about two “bounces” per second.
Perform 100 bounces while breathing throughout the exercise.
The Pilates 100 can be a surprisingly challenging movement, especially at first, but the benefits are tremendous. Don’t be discouraged if you find it particularly challenging; you’ll quickly improve with practice.
[series_posts_list][/series_posts_list]
3. Dead Bug
The dead bug is a great exercise to perform in conjunction with the Pilates 100. While the Pilates 100 focuses on moving your arms while holding your legs in position, the dead bug exercise expands the movement into your legs.
Step 1: Lie on a flat surface with your arms extended straight up toward the ceiling. Bend your hips and knees to 90 degrees, forming right angles with your thighs and torso and with your thighs and shins.
Step 2: Tighten your core while keeping your lower back on the floor while maintaining a neutral spine. Slowly lower your left arm backward toward the floor while extending your right knee and hip toward the floor. Move slowly and breathe in when extending. Stop just before your arm and leg touch the ground, as this can disengage your core muscles.
The starting position is when your arm almost touches the floor or moves back as far as it can, with your opposite leg extended all the way out and your heel almost touching the floor.
Step 3: With your arms and legs in this starting position and holding your core/trunk muscles tight, return your arm and leg to the upright position while simultaneously performing the lowering movements with your other arm and leg. One arm and leg will be moving up while the other arm and leg will be moving down.
Each hand/leg switch counts as one repetition. Try performing 3 sets of 20 repetitions while resting as needed between sets. Move slowly during transitions, taking a second or two to alternate positions.
Don’t be discouraged if you find this exercise difficult; I chose it specifically for that reason. If you can’t perform 20 repetitions at first, simply do what you can, understanding that you will grow stronger over time.
4. Leg Scissors
This is a simple-to-perform exercise and a perfect follow-up exercise to the dead bug. It focuses heavily on the hip flexors and is a very stable exercise.
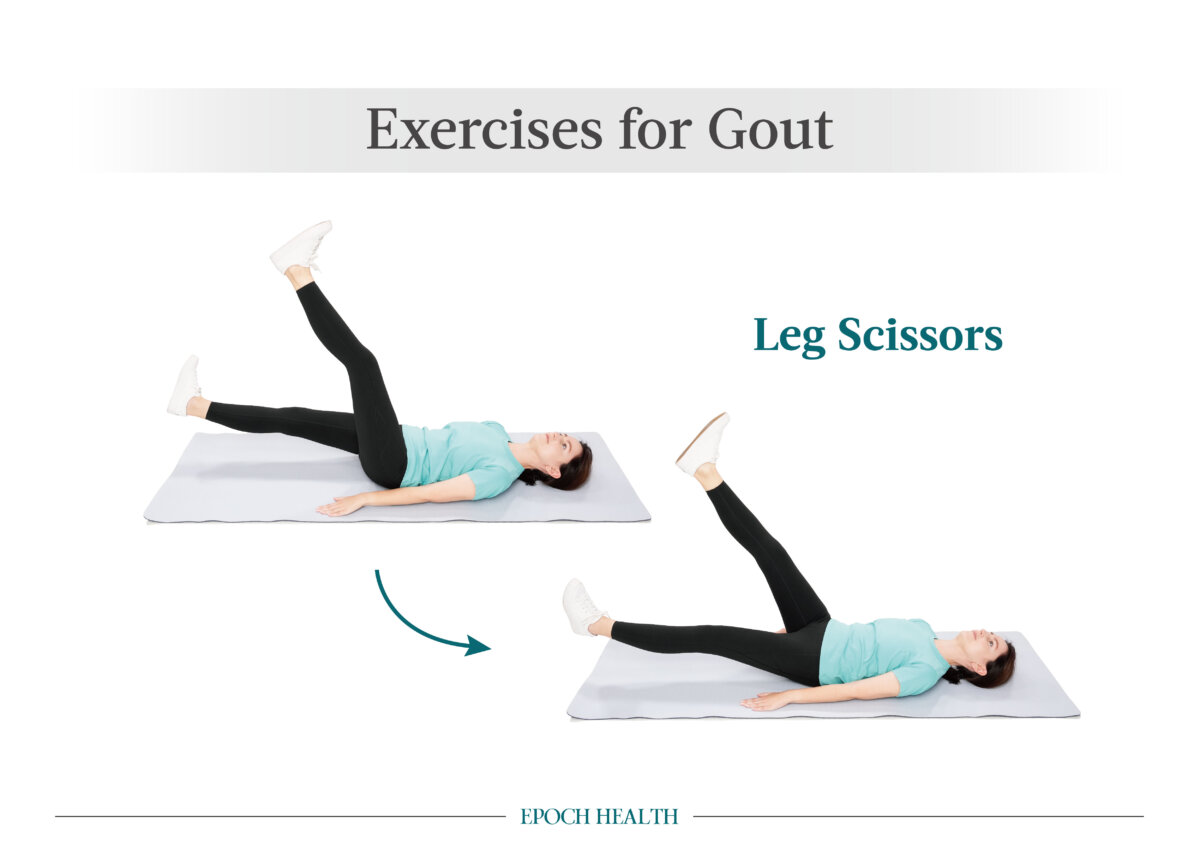
Step 1: Lie on your back on a flat surface with your arms by your side, palms down, and your legs together.
Step 2: Slowly lift one leg upward while keeping your knee straight until your hip is at about 90 degrees and your leg is straight up (or as close as you can get it). Move slowly, taking one to two seconds to move your leg from the ground into a fully extended position.
Step 3: Alternate the movement, lowering the first leg while extending the other.
Each leg lift counts as one repetition. Try to perform 3 sets of 20 repetitions.
Keeping your hands on the floor can help keep the stress from your lower back. You can make this exercise easier by letting your heels touch the floor on the way down; make it more difficult by keeping them off the floor. Be sure to keep your core muscles tight throughout the exercise, and avoid holding your breath.
5. Quadruped Arm/Leg Lifts
This exercise is excellent for providing mobility for your shoulders, hips, and knees. It is also an excellent exercise for increasing your heart rate and blood flow.
Step 1: Start in a hands-and-knees position on a flat surface with your head up and looking out.
Step 2: Simultaneously extend one arm straight toward the wall and the opposite leg straight out toward the wall behind you. You want your elevated arm and leg straight out and level, your head up, and your back straight.
Step 3: At the same time again, lower your arm and leg to the floor, and then lift the other arm and leg (this is a reciprocating exercise). Move slowly, taking at least one second to move into position. Hold the position for one second once you extend your arm and leg.
Lifting one arm and leg counts as one repetition; perform 3 sets of 20 repetitions.
Gout is a highly painful pathology; these exercises can help minimize gout episodes.
*If you have health or mobility issues that may present problems, consult your physician before commencing exercise activity.
[note label=”” title=”” hyperlink=”” description=”More common than MS, leukemia, and Parkinson’s combined, Raynaud’s affects millions. Specific exercises can boost circulation and reduce symptoms.”][/note]
Views expressed in this article are the opinions of the author and do not necessarily reflect the views of The Epoch Times. Epoch Health welcomes professional discussion and friendly debate. To submit an opinion piece, please follow these guidelines and submit through our form here.